Stay updated on the latest Machine Learning developments. Publicado originalmente en The Deep Hub.
Image created by the author with DALL E-3
Table of contents
- How will we be creating the bot?
- X developer portal
- tweepy
- arXiv scrapper
- OpenAI API
- Crafting the tweet
- Setting up the database in MySQL
- Conclusion
According to Elon Musk, before he acquired Twitter, approximately 20% of the accounts on the platform were bots.
The fact that 1 out of every 5 profiles on certain social media platforms might be bots is indeed startling. It prompts us to question the nature of our online interactions and the authenticity of our digital society.
Are these platforms becoming less about human connection and more about navigating a world populated by algorithms and automated personas?
If you´re intrigued about these topics and the future of society, I highly recommend the author Yuval Noah Harari who has extensively explored themes related to technology, consciousness, and the future of humanity.
‘Homo Deus’ by Yuval Noah Harari ‘Homo Deus: A Brief History of Tomorrow’ (published 2016) is a bestselling non-fiction book by Yuval Noah Harari, that…
Putting philosophy aside…
In this article, I will teach you to create an automated X account that publishes the latest academic research in arXiv.
ArXiv is a free distribution service and an open-access archive for scholarly articles. It is hosted by Cornell University and supported by the Simons Foundation and other member institutions.
It’s an essential tool for researchers looking to stay up-to-date with the latest developments in their field
How will we be creating the bot?
The first step is to make an account in the developer portal of Twitter to connect with its API and post tweets automatically.
Secondly, we´ll create a scrapper to retrieve academic papers directly from arXiv. This won´t be complex since arXiv has an API that will simplify things for us.
The next phase will be setting up an account in the OpenAI developer portal. This will enable us to access ChatGPT API and send prompts directly from our script.
Finally, once we have completed our setup we will create a database with MySQL to store the information we retrieve and the tweets we create.
X developer portal
The Twitter Developer Portal is the central hub for developers accessing Twitter’s suite of APIs and development tools.
Key features include:
- Access to the Twitter API
- Project and App Management
- Documentation and Resources
- Analytics and Insights
- Community and Support
Whether you’re looking to analyze tweets for sentiment**, stream live tweet data**, or integrate Twitter functionality into your app or website you will need to use the developer portal.
How the does the portal work?
 Step 1 (Create an account) → Step 2 (Add a project) → Step 3 (Select the access level) | Source

Column 1 — Account: The first step involves setting up a “Developer account” where one can choose between a personal or team account.
Column 2 — Product track: After the account is set up, the next step is to “Add a Project” to organize work and manage access to the API by use case.
There are three tracks highlighted for the type of project one can add:
- Standard
- Academic Research
- Business
Column 3 — Access level: The final column represents the access level which is segmented into three levels:
- Basic
- Elevated
- Custom
(In our case we will choose the free level*).*
Building a profile in the developer portal
1.- Setting up a profile
To create an account you will have to register on the main page.
Select the *“*Sign up for Free Account” option.
 Singing up in the developer portal
You will be asked to provide a brief description of how you plan to use the developer portal.
 Developer agreement and policy
Once you have completed these steps you´ll be directed to the main page of the portal.
2.- Developer portal overview
After creating your account, you will visualize the following interface:
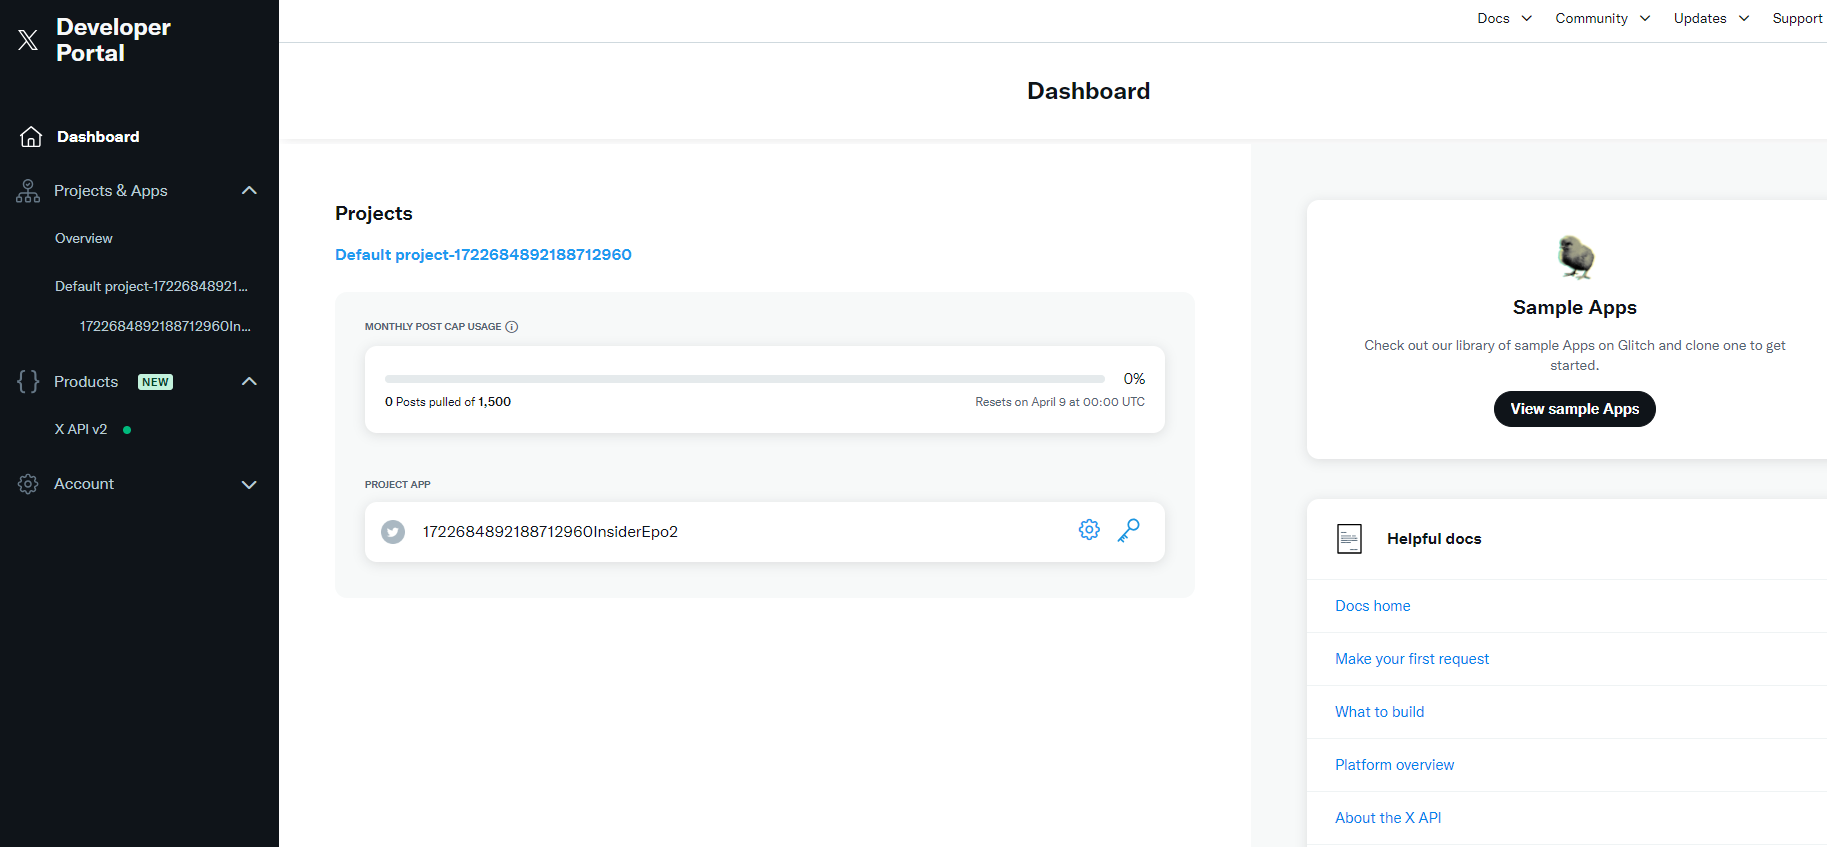 Developer portal dashboard
The main pane shows an overview of the dashboard. It displays a section titled ‘Projects’ with a default project ID listed.
Below the project ID, there is a gauge that tracks the “Monthly POST Cap Usage” indicating how many POST requests have been made against a cap of 1.500.
# Projects
You can have multiple projects based on what you are trying to do.
For each project, you might have an idea or a goal — like creating a way for people to tweet from a website or analyzing how often people talk about a certain topic on Twitter.
 Default project in the developer portal
# Apps
The app is a specific software that you’re building within the project workspace.
It’s the actual tool you’re planning to make, which could be anything from a bot that tweets daily weather updates to an analytics program that measures tweet engagements.
Each app gets a unique code, like a serial number, which lets X recognize it and allows it to talk to Twitter’s system.
 Default app in the developer portal
# Default project and app
In the Twitter Developer Portal, as a first-time user or when you’re setting up a new account, the system automatically creates a starting project and an associated app for you.
This is done so that you have a ready-made space and a tool to start experimenting with the Twitter API right away.
3.- Private keys and tokens
When you create an application within the Twitter Developer Portal, you’re provided with keys and tokens necessary for OAuth authentication.
These include:
- API Key and Secret (used to authenticate the app with Twitter).
- Access Token and Secret (used to make API requests on behalf of a user).
 Consumer keys (API Key and Secret) — Authentication tokens (Bearer Token, Access Token, and Secret). For this project, we won´t need the bearer token.
4.- User authentication settings
We have everything we need with the project and app default provided by Twitter. The only section we´ll have to modify is the user authentication settings.
To access it navigate to “your default application” → “Settings” → scroll down to “user authentication settings”.
When setting up the setting, you can specify the level of access it requires:
- Read: Allows reading data, such as viewing Tweets.
- Write: Allows making changes, such as posting Tweets.
- Direct Messages: Allows sending and receiving direct messages.
Select the “read and write” option in the App permissions and “Web App, Automated App, or Bot” in the Type of App.
In the App info section, use “http://localhost” as the Callback URL. You´ll also have to indicate a website URL.
If you don´t have one you can pass the link to a public direction such as your GitHub repository.
 Developer portal (Select Read and Write in App permissions and Web App, Automated App or Bot in Type of App) - Source
Once you have edited the user authentication settings, refresh the consumer keys and authentication tokens.
If you want to know more about the Twitter API, they have a great guide in their platform. You can check it out here.
5.- Connecting with the Twitter API through Python
Once we have all settled up we´ll start to create our Python program.
In the first place, I will create a .env file to store the tokens and private keys from the X developer account.
As we stated before, you´ll need to save the four following keys:
- API Key and Secret.
- Access Token and Secret.
 dotenv file example | Editor´s visual studio
If you don´t know how to work with .env files check this brief tutorial: https://www.geeksforgeeks.org/how-to-create-and-use-env-files-in-python/
tweepy
Tweepy is an open-source Python library that allows you to interact with the Twitter API. It provides a convenient way to access the full range of Twitter API functionality.
This library will facilitate us a lot of the task and with a simple script we´ll be able to create the twitter bot.
from dotenv import load_dotenv
import os
import tweepy

load_dotenv()


consumer_key = os.getenv("TWITTER_CONSUMER_KEY")
consumer_secret = os.getenv("TWITTER_CONSUMER_SECRET")
access_token = os.getenv("TWITTER_ACCESS_TOKEN")
access_token_secret = os.getenv("TWITTER_ACCESS_TOKEN_SECRET")

client_twitter = tweepy.Client(consumer_key= consumer_key,
                    consumer_secret=consumer_secret,
                    access_token=access_token,
                    access_token_secret=access_token_secret)

def post_tweet(tweet_content):
    # Make sure to import and authenticate your Twitter client here
    response = client_twitter.create_tweet(text=tweet_content)
    print(f"Tweet posted: {response.data}")
tweepy script | GitHub
tweepy.Client() is a constructor that creates a new Client object.
A Client object serves as the main entry point to the Twitter API v2 within the tweepy library, allowing you to make requests to the API endpoints with the necessary credentials.
If you followed all the steps correctly, running this script should post a tweet in your connected X account.
Awesome! We have completed the first step, learning how to post automatically in X with the developer portal.
Now let´s continue to the next phase of the project.
Creating an arXiv scrapper
ArXiv is a public platform that allows researchers to share their papers facilitating open access to the latest research findings.
The API supports custom search queries based on a wide range of criteria, enabling users to automate the process of finding relevant research papers.
If you´re not familiar with this platform make sure to take a look at it before understanding how we´ll be scrapping it.
Link to arXiv main page: https://arxiv.org/.
arXiv API
arXiv has a public API, which means that it is accessible by anyone without the need for authentication or an API key.
To connect with the API we need an endpoint which is a specific url at which a web service listens for requests.
APIs work using requests and responses, when you make a request to an API endpoint, the API performs a specified action (like retrieving, updating, or deleting data) and then responds with the data you requested or a confirmation of the action taken.
HTTP request and response between client and server | Source
This is the endpoint of the arXiv API: “http://export.arxiv.org/api/query?”.
# Request methods
Once you have connected with the server you´re trying to access you have to specify how you are going to interact with it.
HTTP (Hypertext Transfer Protocol) defines a set of request methods to indicate the action to be performed for a given resource.
 Popular HTTP methods | Source
In our case, we want to read and retrieve information from the API so we will make an HTTP GET request.
# Query parameters
Now we know that we are going to perform a GET request in order to retrieve information from arXiv.
However, we have to specify what information we want to retrieve from arXiv.
These are the query specifications:
  query_params = {
        'search_query': ,  # Category to search
        'start': ,         # Starting point of the results
        'max_results':     # Number of results to return
    }
ArXiv has a wide catalog of categories, Machine Learning is just a subfield.
You can find a well-documented taxonomy in the following link: https://arxiv.org/category_taxonomy
In this example, we will be gathering information from the Computer Science category. However, the process will remain the same regardless of the field you choose.
 Some of the subfields inside Computer Science | Source
Now that we have a general idea of the structure of the arXiv API, let´s build our own scrapper. I´ll scrape the cs.LG subfield which corresponds to the Machine Learning category.
import requests
import feedparser

def arXiv_scrapper():
    # arXiv API endpoint
    ARXIV_API_URL = "http://export.arxiv.org/api/query?"

    # Parameters for the API query
    query_params = {
        'search_query': 'cat:cs.LG',  # Search in the Machine Learning category, change as needed
        'start': 0,  # Starting point of the results
        'max_results': 1,  # Number of results to return, adjust as needed
    }

    # Make the request to arXiv API
    response = requests.get(ARXIV_API_URL, params=query_params)

    # Parse the response using feedparser
    feed = feedparser.parse(response.content)

    return feed

print(arXiv_scrapper())
arXiv scrapper | Source: GitHub
- The
requests.getfunction is used to make an HTTP GET request to the arXiv API. feedparser.parse(response.content)is used to parse the XML content returned by the arXiv API.
This script will print all the arXiv information. You can play around with the feed returned and access to the different categories in the structure.
To visualize all the categories extracted with the arXiv API modify the last print statement:
print(arXiv_scrapper()["entries"][0].keys()) arXiv API entries | User´s visual studio
From all these fields we´ll extract only the following ones:
title, author, summary, published_date, link and tags.
We´ll do this with the following code:
for entry in feed.entries:

    url=[link.href for link in entry.links if link.rel == 'alternate'][0]
         if entry.links else None

    # Join authors by comma, you might need to adjust based on your schema
    authors = ', '.join(author.name for author in entry.authors)

    # Extract additional fields from the entry
    id = entry.id
    title = entry.title
    abstract = entry.summary
    publication_date = entry.published

    keywords = entry.get('tags', '')

    keywords = ', '.join([tag['term'] for tag in keywords])
    if keywords else ''
Before continuing to the next step, make sure to test the script with various categories to ensure its functionality.
Setting up the OpenAI API
The developer platform from OpenAI grants us the opportunity to utilize AI models created by the company.
 OpenAI developer platform - Source
Before using any model you´ll have to deposit some money, which will be your credit balance.
The plan of OpenAI is “pay as you go”, meaning that you will only have to pay when you make a call to the API.
 OpenAI billing settings - Source
Once you have deposited some money, you´ll have to create a private key in the API keys section.
Make sure to copy this key and paste it into the .envfile we created previously.
 OpenAI api keys - Source
Selecting a model
OpenAI has a wide range of models. You can use the one you prefer based on its pricing and quality.
I will choose the gpt-3.5-turbo which is not the best one but offers a good trade-off in terms of price and quality.
Check here the pricing of the different models.
Accessing the OpenAI API with Python
Once we have settled our account we can make calls to the API quite easily with the openai library.
from openai import OpenAI

from dotenv import load_dotenv
import os

load_dotenv()

openai_api_key = os.getenv("OPENAI_API_KEY")

def answer_prompt(prompt):

    client = OpenAI(api_key=openai_api_key)

    response = client.chat.completions.create(
        messages=[
            {
                "role": "user",
                "content": prompt,
            }
        ],
        model="gpt-3.5-turbo",
    )

    response = response.choices[0].message.content

    return response
OpenAI script | GitHub
As you can see the code is quite straightforward.
To know more about the openai library check this link: https://platform.openai.com/docs/api-reference
To combine the openai API with the feed we extracted from arXiv we´ll create a customized function. We´ll extract the title, abstract, and link of the article to create the prompt.
This is the prompt we´ll be passing to the GPT 3.5 model:
“Create an engaging tweet presenting this research ‘{article[‘title’]}’ — {article[‘summary’]} and provide the link to the article: {article[‘link’]}. The twit should not exceed 280 characters”.
Let´s take a look to the whole function:
def generate_tweet(article):
    if article is None:
        return "No article found to tweet about."

    client = OpenAI(api_key=openai_api_key)


    # Define the initial content for the tweet
    initial_content = f"Create an engaging tweet presenting this research '{article['title']}' - {article['summary']} and provide the link to the article: {article['link']}, the twit should not exceed 280 characters"

    # Initialize tweet content
    tweet_content = ""

    # Attempt to generate a tweet within the length limit
    attempts = 0
    while len(tweet_content) > 280 or tweet_content == "":
        # Increase attempts count
        attempts += 1

        # If we've tried too many times, break to avoid an infinite loop
        if attempts > 5:
            return "Failed to generate a short enough tweet after several attempts."

        response = client.chat.completions.create(
            messages=[
                {
                    "role": "user",
                    "content": initial_content,
                }
            ],
            model="gpt-3.5-turbo",
        )

        tweet_content = response.choices[0].message.content
        # Ensure the tweet is within the length limit
        if len(tweet_content) > 280:
            tweet_content = ""  # Reset tweet content and try again

    return tweet_content
arXiv content combined with OpenAI API | GitHub
I won´t go too deep into this piece of code, however, you may notice that it is quite similar to the first example we saw.
These were the general steps followed in the function:
- Pass as an argument the article information extracted by the arXiv scrapper.
- Create a client with the openai api key.
- Create a prompt including the title, abstract, and link of the article.
- Pass the prompt to the OpenAI client.
Crafting the tweet
Now that we have created the tweet content with the generate_tweetfunction, we´ll just have to call our tweepy client to post it in our connected X account.
We just have to pass as an argument the result of the generate_tweet() function to the method client_twitter.create_tweet()we defined previously.
Here´s how we´ll do it:
import tweepy

from dotenv import load_dotenv
import os

load_dotenv()

consumer_key = os.getenv("TWITTER_CONSUMER_KEY")
consumer_secret = os.getenv("TWITTER_CONSUMER_SECRET")
access_token = os.getenv("TWITTER_ACCESS_TOKEN")
access_token_secret = os.getenv("TWITTER_ACCESS_TOKEN_SECRET")

client_twitter = tweepy.Client(consumer_key= consumer_key,
                    consumer_secret=consumer_secret,
                    access_token=access_token,
                    access_token_secret=access_token_secret)

def post_tweet(tweet_content):
    response = client_twitter.create_tweet(text=tweet_content)
    print(f"Tweet posted: {response.data}")
Awesome! Now we have gone through the full process.
We´ve retrieved information from an article with our arXiv scrapper, passed this information to our OpenAI model, and finally tweeted it with our tweepy client.
However, let´s take this one step further!
This information we are storing has a lot of value and we don´t want to lose it. Therefore, we´ll store the arXiv metadata and the tweets we generate in a database!
Setting up the database
Now that we have everything working correctly, we will add another step, we´ll store the papers from arXiv in a database along with our tweets.
This step is not strictly necessary, but I prefer to keep all the information stored. It could be useful in the future for more complex analysis.
(I´ll use MySQL*, however, you can use the* “SQL” database you prefer*, and the process will be* very similar*).*
MySQL tutorial by Fireship 🔥
MySQL database
The first step will be to set up the database.
You´ll have to install MySQL in the following link. Make sure to choose the last version and your Operating System.
Once installed, you can access the MySQL command-line client by typing mysql -u username -p in your terminal or command prompt, and then entering your password when prompted.
Replace username with your actual MySQL username.
Once logged in, you can create a new database by executing the following SQL command:
CREATE DATABASE mydatabase;Replace mydatabase with the name you wish to give your database. In my case, I will name it “deep_learning_papers”.
Before you can start creating tables, you need to select the database you just created with the command:
USE mydatabase;Now that your database is selected, you can start creating tables within it.
I will create the table “papers” and add the following columns:
CREATE TABLE papers(
   id INT AUTO_INCREMENT,
   title VARCHAR(255),
   author VARCHAR(255),
   abstract TEXT,
   publication_date VARCHAR(255),
   url varchar(255),
   keywords TEXT,
   summary TEXT,
   PRIMARY KEY(id)
  );
As you may have noticed each of these columns corresponds to the outputs of the arXiv API which for each article returns the title, author, abstract, publication_date, url, and keywords.
The last column (summary) corresponds to the tweet created by GPT 3.5.
This will be the structure of my database:
 Structure of the database | MySQL
Connecting to our database with Python
To set up a connection with our database we´ll use the mysql library.
These are the steps we´ll follow:
1.- Establishing a connection to the database:
conn = mysql.connector.connect(
    host=mySQL_host,
    user=mySQL_user,
    password=mySQL_password,
    database=mySQL_database
)
Make sure to store your host, user, password, and database name in the .env file. You´ll need them to make a connection with your MySQL database.
2.- Creating a Cursor Object:
cursor = conn.cursor()Once the connection is established, a cursor object is created using conn.cursor(). The cursor is used to execute SQL queries.
3.- Preparing the INSERT SQL Query:
insert_query = """
    INSERT INTO papers (title, author, abstract, publication_date, url, keywords, summary)
    VALUES (%s, %s, %s, %s, %s, %s, %s);
This SQL query inserts a new record into the papers table.
The VALUES (%s, %s, %s, %s, %s, %s, %s); part uses placeholders (%s) for parameterized queries. These placeholders will be replaced with actual values when the query is executed.
4.- Executing the Query:
cursor.execute(insert_query, (title, author, abstract,
               publication_date, url, keywords, summary))
Once we have connected to our database, created a cursor object and defined our INSERT query we are ready to execute the query by calling the cursor’s execute() method.
Let´s take a look at the whole function:
import os
from dotenv import load_dotenv

import mysql.connector
from mysql.connector import Error


# Load the environment variables

load_dotenv()

mySQL_database = os.getenv("MYSQL_DATABASE")
mySQL_password = os.getenv("MYSQL_PASSWORD")
mySQL_host = os.getenv("MYSQL_HOST")
mySQL_user = os.getenv("MYSQL_USER")

def insert_article(title, author, abstract, publication_date, url, keywords, summary):
    try:
        conn = mysql.connector.connect(
            host=mySQL_host,
            user=mySQL_user,
            password=mySQL_password,
            database=mySQL_database
        )
        cursor = conn.cursor()

        # Use the INSERT query as before, now publication_date is directly a string
        insert_query = """
        INSERT INTO papers (title, author, abstract, publication_date, url, keywords, summary)
        VALUES (%s, %s, %s, %s, %s, %s, %s);
        """
        cursor.execute(insert_query, (title, author, abstract, publication_date, url, keywords, summary))

        conn.commit()
    except Error as e:
        print(f"Error: {e}")
    finally:
        if cursor is not None:
            cursor.close()
        if conn is not None:
            conn.close()
MySQL database creation | GitHub
Conclusion
Now we have definitely finished our entire setup! This will be the backbone of our application.
I hope you found it useful or learned something at least in one part of the project.
If you´d like to build something with this, make sure to fork the repository and leave a star.
(What we´ve done is purely educational and a very simple project*, however we pretend to* build something more elaborated in the future).
To finish the article, I´ll leave you below the whole script where we combine all the points we´ve seen along the post!
import requests
import feedparser
from datetime import datetime

from openai import OpenAI

import tweepy

import mysql.connector
from mysql.connector import Error

from dotenv import load_dotenv
import os

load_dotenv()

consumer_key = os.getenv("TWITTER_CONSUMER_KEY")
consumer_secret = os.getenv("TWITTER_CONSUMER_SECRET")
access_token = os.getenv("TWITTER_ACCESS_TOKEN")
access_token_secret = os.getenv("TWITTER_ACCESS_TOKEN_SECRET")

openai_api_key = os.getenv("OPENAI_API_KEY")

mySQL_database = os.getenv("MYSQL_DATABASE")
mySQL_password = os.getenv("MYSQL_PASSWORD")
mySQL_host = os.getenv("MYSQL_HOST")
mySQL_user = os.getenv("MYSQL_USER")


client_twitter = tweepy.Client(consumer_key= consumer_key,
                    consumer_secret=consumer_secret,
                    access_token=access_token,
                    access_token_secret=access_token_secret)

def arXiv_scrapper():
    # arXiv API endpoint
    ARXIV_API_URL = "http://export.arxiv.org/api/query?"

    # Parameters for the API query
    query_params = {
        'search_query': 'cat:cs.LG',  # Search in the Machine Learning category, change as needed
        'start': 0,  # Starting point of the results
        'max_results': 1,  # Number of results to return, adjust as needed
    }

    # Make the request to arXiv API
    response = requests.get(ARXIV_API_URL, params=query_params)

    # Parse the response using feedparser
    feed = feedparser.parse(response.content)

    return feed

# Connecting the data to the database in MySQL
def insert_article(title, author, abstract, publication_date, url, keywords, summary):
    try:
        conn = mysql.connector.connect(
            host=mySQL_host,
            user=mySQL_user,
            password=mySQL_password,
            database=mySQL_database
        )
        cursor = conn.cursor()

        # Use the INSERT query as before, now publication_date is directly a string
        insert_query = """
        INSERT INTO papers (title, author, abstract, publication_date, url, keywords, summary)
        VALUES (%s, %s, %s, %s, %s, %s, %s);
        """
        cursor.execute(insert_query, (title, author, abstract, publication_date, url, keywords, summary))

        conn.commit()
    except Error as e:
        print(f"Error: {e}")
    finally:
        if cursor is not None:
            cursor.close()
        if conn is not None:
            conn.close()

def generate_tweet(article):
    if article is None:
        return "No article found to tweet about."

    client = OpenAI(api_key=openai_api_key)


    # Define the initial content for the tweet
    initial_content = f"Create an engaging tweet presenting this research '{article['title']}' - {article['summary']} and provide the link to the article: {article['link']}, the twit should not exceed 280 characters"

    # Initialize tweet content
    tweet_content = ""

    # Attempt to generate a tweet within the length limit
    attempts = 0
    while len(tweet_content) > 280 or tweet_content == "":
        # Increase attempts count
        attempts += 1

        # If we've tried too many times, break to avoid an infinite loop
        if attempts > 5:
            return "Failed to generate a short enough tweet after several attempts."

        response = client.chat.completions.create(
            messages=[
                {
                    "role": "user",
                    "content": initial_content,
                }
            ],
            model="gpt-3.5-turbo",
        )

        tweet_content = response.choices[0].message.content
        # Ensure the tweet is within the length limit
        if len(tweet_content) > 280:
            tweet_content = ""  # Reset tweet content and try again

    return tweet_content

def post_tweet(tweet_content):
    # Make sure to import and authenticate your Twitter client here
    response = client_twitter.create_tweet(text=tweet_content)
    print(f"Tweet posted: {response.data}")


def process_arxiv_feed(feed):
    # Extract and structure the data
    for entry in feed.entries:

        tweet_content = generate_tweet(entry)

        # Assuming there is a single URL per entry, and adjusting 'keywords' as needed
        url = [link.href for link in entry.links if link.rel == 'alternate'][0] if entry.links else None

        # Join authors by comma, you might need to adjust based on your schema
        authors = ', '.join(author.name for author in entry.authors)

        # Extract additional fields from the entry
        id = entry.id
        title = entry.title
        abstract = entry.summary
        publication_date = entry.published

        keywords = entry.get('tags', '')
        keywords = ', '.join([tag['term'] for tag in keywords]) if keywords else ''

        summary = tweet_content

        # Call your function to insert data
        insert_article(title, authors, abstract, publication_date, url, keywords, tweet_content)

feed = arXiv_scrapper()

articles = feed.entries

# article = fetch_article()

tweet_content = generate_tweet(articles[0])

process_arxiv_feed(feed)

post_tweet(tweet_content)
Main script - GitHub
Bibliography
- https://arxiv.org/
- https://developer.twitter.com/
- https://pypi.org/project/paperscraper/
- https://platform.openai.com/docs/overview
- https://github.com/Mahdisadjadi/arxivscraper
- https://realpython.com/twitter-bot-python-tweepy/
- https://docs.tweepy.org/en/stable/getting_started.html
Thanks for reading! If you like the article make sure to clap (up to 50!) and follow me on Medium to stay updated with my new articles.
Also, make sure to follow my new publication!
The Deep Hub Your data science hub. A Medium publication dedicated to exchanging ideas and empowering your knowledge.